Bootloader Unlocking for Samsung Galaxy S10 and S20 Devices

Some said it was impossible. Others dared to try. I dared to spend $100 and download a sketchy USB Redirector software to have someone else run their custom tool remotely to unlock my device. I had the resolve. I dared to swipe my credit card.

SamPWND Bootloader Unlocking for SM-G970U AT&T Model

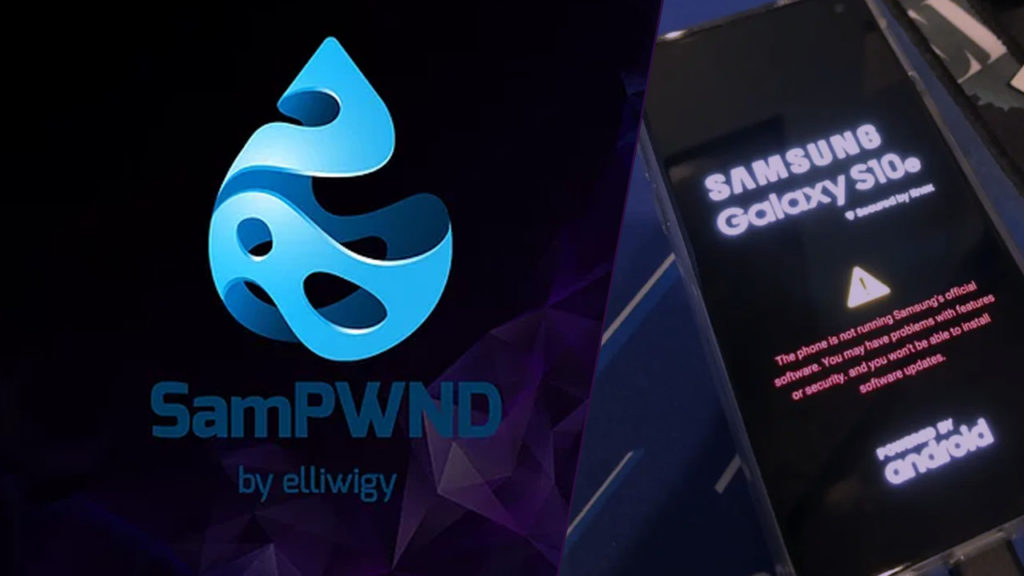
It's no secret that Samsung devices have shipped with permanently locked bootloaders on most US carriers for many years now. I recently purchased a used S10e SM-G970U ATT and was unfortunately reminded of this. Somehow I had forgotten what a pain it was to unlock these things before my purchase. After some research when I found the OEM unlocking feature in Developer Options was missing in Android. Some more research later I learned that unlocking is in fact possible. Possible if you have the means. A functional exploit for S10, S20, and Fold/Flip devices does in fact exist to unlock the bootloader but it is private and proprietary. I purchased an unlock for $100 flat from https://www.sampwnd.com/ and it worked great. Hopefully this exploit is released to the public in the future but this is out best shot currently.

More information on requirements and supported devices and be found in elliwigy XDA developers post: https://forum.xda-developers.com/t/sampwnd-usa-model-bl-unlock-info-u-u1-w.4201689/

So I provided my DID adb shell getprop ro.boot.em.did and paid my hundred bones. Then I waited for a Discord message. They can either contact you with Telegram or Discord it's up to you. After getting a message to download some software called usbredirector-customer-module.exe I connected to their session with my device in Download Mode and within 10 seconds my device rebooted with an unlocked bootloader.

Was it worth it? I think yes.

Jailbreak iOS device with Android Phone – One Tap checkra1n TWRP App

One tap to jailbreak iOS with Android (checkra1n TWRP)
One tap to jailbreak iOS with Android (checkra1n TWRP) - Watch my video guide here!

Download on GitHub: checkra1n TWRP: Jailbreak iOS with Android

Long time no see iOS/Android enthusiasts. I wanted to share a useful app I created to automated the process of running checkra1n for arm64 (Android Phone/Tablet) in TWRP (Team Win Recovery Project). This is a fully open source program (excluding the checkra1n binary) licensed under Zero Clause BSD. View it on GitHub here.

TWRP has a built in functionality to queue commands for the next recovery boot. These commands are located in /cache/recovery/command which is just a text file that TWRP reads. This is the same functionality that allows Over The Air (OTA) updates for custom ROMs to boot and reflash themselves.

Using this queue system the checkra1n TWRP app copies an Open Recovery Script (flashable .zip) to /data/checkra1n/checkra1n.zip and boots to recovery by invoking reboot recovery. The included checkra1n.zip then executes and boots back to system reboot system after the checkra1n log message of [*]: All Done is received.

This will not increase the comparability of checkra1n for Android devices but my 2015 Nexus 5X and 2018 Mi Mix 3 both run this application flawlessly. If you were already using your Android device to run checkra1n this should make things easier for you as you don't need to interact with a shell at all on invoke/remember commands.

To flash the .zip within TWRP without running the app, which is useful if you leave your Android turned off until you need it for a retether, you can find the flashable Open Recovery Script in /data/checkra1n/ and flash it from the Install menu within TWRP.

Happy jailbreaking! (please report bugs on the Github Bug Tracker)

Edit: Removed from Google Play for TOS https://github.com/downthecrop/checkra1n-twrp/issues/3

If you would rather run the binary directly you can follow my old guide here: https://downthecrop.xyz/blog/jailbreak-ios-device-with-android-phone-checkra1n-for-android-tutorial/

Jailbreak iOS device with Android Phone – checkra1n for Android Tutorial

How to run checkra1n on Android to jailbreak iOS - Watch my video guide here!

Edit : 9/9/2020 I've made an app to easily run the required commands! Check out my updated guide here: https://downthecrop.xyz/blog/jailbreak-ios-device-with-android-phone-checkra1n-twrp-app/

Did you know you can use an Android Phone to jailbreak iOS using checkra1n? Here's the step by step guide and tutorial to explain how to run checkra1n on Android.

  • Rooted Android device
  • USB-C to USB-A Adapter
  • Lightning cable
  • TWRP Custom Recovery

When you have gathered the supplies navigate to the official checkra1n website and download the lastest arm64 Linux binary of checkra1n

https://checkra.in/

Note the location you downloaded the file to. You will need to know the absolute path the file is located so you can execute it from a terminal command line.

Once you have the file downloaded boot your Android phone into Custom Recovery. Running the tool from Custom Recovery instead of directly inside Android you don't need to worry about a conflict between different processes fighting over the USB controller. I wasn't able to run checkra1n from a fully booted Android 10 but I was able to run it from Custom Recovery! Your luck may vary but Custom Recovery is the most reliable option.

Open a Terminal in Custom Recovery (TWRP 3.3.1-17 was used in my video) and change directory to where you saved checkra1n

cd /sdcard/Download

Next we need to add the execute flag to the binary so it can be run as a program

chmod +x checkra1n

Finally we can run checkra1n from Android

./checkra1n -c -v

Connect your iOS device using your USB-C to USB-A adapter and your Lightning cable.

Now we need to manually enter DFU mode on our iOS device. This is done differently on different devices so if you are unsure just look up "How to put iPhone X into DFU mode" replacing iPhone X with your model and you should find some button combinations to enter DFU.

If you have successfully put your iOS device into DFU and it is connected to your Android Phone running checkra1n the program should recognize the DFU mode USB device and run the exploit!

For a complete step by step guide of using the new checkra1n for Android you can follow my YouTube guide here

How To Hide Android 10 Q Navigation Bar

With Android 10 Q full gesture navigation is finally available. Google has unfortunately overlooked the option for users to simply hide the bottom navigation bar once they have become accustomed to the gestures. Thankfully there is already an app that will allow you to toggle the navbar’s visibility (well actually it just draws it below the screen). This can be done easily on rooted devices but it is also available to non-rooted phones as well. If your device DOES NOT have root access this requires a PC (Windows, Linux/BSD, or Mac) to enable the functionality.

This does NOT require your device to be rooted. The following ADB command does NOT void your devices warranty, you are just granting an additional permission to an app that is unavailable through the GUI.

If your device IS ALREADY rooted you can simply grant the app SuperUser and skip the command.

There are currently two apps that offer a toggle setting for the navigation bar once the required command has been run.

  1. Navigation Gestures - Swipe Gesture Controls! by XDA (recommended)
  2. Hide Navigation Bar by Manuel Wrage

If you are rooted: grant your selected app SuperUser, finish the on-boarding and enable the setting. Your navigation bar should now be off screen.

For those who aren’t rooted, lets now grant your selected app the secure settings permission. Depending on which app you decide to use the command will be slightly different as you are actually granting the specific app an additional system permission. 

Enable Developer Mode & USB Debugging

First you need to let your phone communicate with your PC via USB debugging.

Open your Android settings app, scroll to bottom and select “About Phone”, scroll to the bottom again and tap the build number seven(7) times, enable developer mode

Settings>About Phone>Tap Build Number 7 Times>Enable Developer Mode

Now that you’re a developer go back to the main settings page, select System, Advanced, Developer options, enable USB debugging 

Settings>System>Advanced>Developer options>USB debugging

Installing ADB

ADB or the Android Debug Bridge is available for all platforms. You can follow this in depth guide on XDA https://www.xda-developers.com/install-adb-windows-macos-linux/

If you’re on Linux you should be able to install ‘android-tools-adb’ on any Debian or Ubuntu based system. https://packages.debian.org/buster/android-tools-adb

On Arch/Manjaro systems ADB is provided through the ‘android-tools’ package. https://www.archlinux.org/packages/community/x86_64/android-tools/

Once you have some kind of ADB binary on your system you can now plug in and trust your device, then run the following command depending on which of the toggle apps you’ve chosen.

Navigation Gestures - Swipe Gesture Controls! by XDA

adb shell pm grant com.xda.nobar android.permission.WRITE_SECURE_SETTINGS

Hide Navigation Bar by Manuel Wrage

adb shell pm grant com.ivianuu.hidenavbar android.permission.WRITE_SECURE_SETTINGS

If you get an error about the device not being trusted, unlock your device and trust your PC for USB debugging.

After you have successfully granted the app the permission you’re done! Now enter the app and toggle the setting on or off whenever you want!