Manually Update Samsung Galaxy S10 To Android 10

After unlocking the bootloader on my S10e I was unable to flash an unofficial Lineage OS 17.1 (Android 10) ROM to my device. I was originally on the stock AT&T ROM which STILL (January 2021) hasn't been updated to Android 10. Most other carriers have released Android 10 for their S10 devices but AT&T not only is shipping devices with fully locked bootloaders but also aren't supporting their customers with updates. With the power of modern technology and a little ingenuity we can right these wrongs.

First you'll need an unlocked bootloader so you can flash your device with Odin. I was able to purchase an unlock for my S10e from SamPWND (read my article here) but if you already have an unlocked bootloader you're ready to flash.

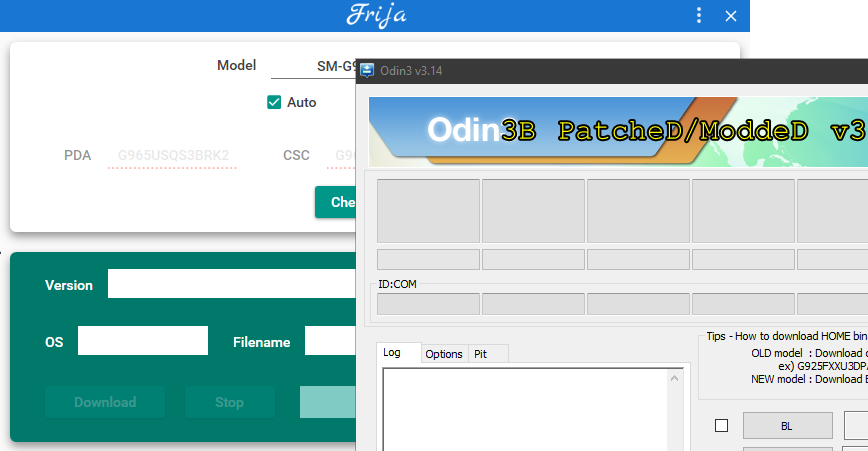
Two tools are required for this update process. Frija for downloading the updated stock Android 10 ROM and Odin3 to flash your device in download mode.

Frija Download: https://forum.xda-developers.com/t/tool-frija-samsung-firmware-downloader-checker.3910594/

Odin3 Download: https://forum.xda-developers.com/t/patched-odin-3-13-1.3762572/

Downloading Stock Android 10

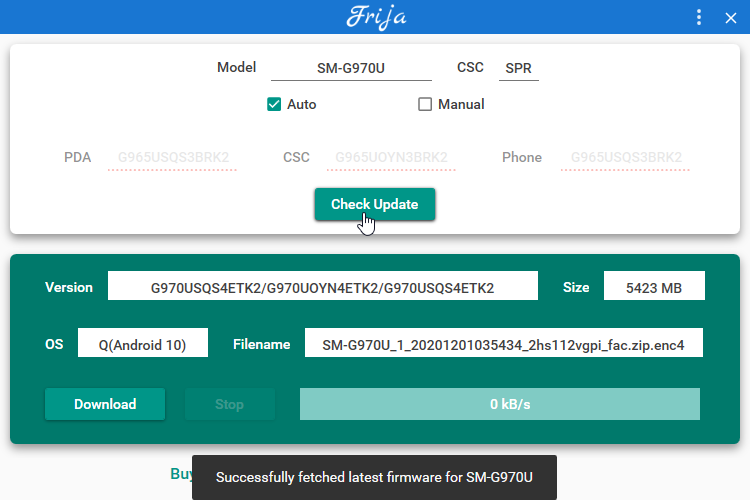
An Android 10 Custom Rom requires your device to already be on Android 10 to flash it successfully. Since AT&T hasn't released a version of Android 10 I used Frija to download a clean ROM. I needed to use the SPR (Sprint) code in CSC which specifies the carrier. Check for updates, then download. Frija will decrypt the update so you can use it with Odin.

Frija Download Tool

Once you've downloaded the update unzip it somewhere. You will have a few files that match the input fields in the Odin3 tool. Put your device into Download Mode and set each of the fields to their matching file from the update. Even the BL field. This will NOT relock your bootloader. You can flash TWRP or a custom recovery after you have verified you can boot into Stock Android 10.

Flash and Wait. Then your device should reboot into Android 10!

How To Hide Android 10 Q Navigation Bar

With Android 10 Q full gesture navigation is finally available. Google has unfortunately overlooked the option for users to simply hide the bottom navigation bar once they have become accustomed to the gestures. Thankfully there is already an app that will allow you to toggle the navbar’s visibility (well actually it just draws it below the screen). This can be done easily on rooted devices but it is also available to non-rooted phones as well. If your device DOES NOT have root access this requires a PC (Windows, Linux/BSD, or Mac) to enable the functionality.

This does NOT require your device to be rooted. The following ADB command does NOT void your devices warranty, you are just granting an additional permission to an app that is unavailable through the GUI.

If your device IS ALREADY rooted you can simply grant the app SuperUser and skip the command.

There are currently two apps that offer a toggle setting for the navigation bar once the required command has been run.

  1. Navigation Gestures - Swipe Gesture Controls! by XDA (recommended)
  2. Hide Navigation Bar by Manuel Wrage

If you are rooted: grant your selected app SuperUser, finish the on-boarding and enable the setting. Your navigation bar should now be off screen.

For those who aren’t rooted, lets now grant your selected app the secure settings permission. Depending on which app you decide to use the command will be slightly different as you are actually granting the specific app an additional system permission. 

Enable Developer Mode & USB Debugging

First you need to let your phone communicate with your PC via USB debugging.

Open your Android settings app, scroll to bottom and select “About Phone”, scroll to the bottom again and tap the build number seven(7) times, enable developer mode

Settings>About Phone>Tap Build Number 7 Times>Enable Developer Mode

Now that you’re a developer go back to the main settings page, select System, Advanced, Developer options, enable USB debugging 

Settings>System>Advanced>Developer options>USB debugging

Installing ADB

ADB or the Android Debug Bridge is available for all platforms. You can follow this in depth guide on XDA https://www.xda-developers.com/install-adb-windows-macos-linux/

If you’re on Linux you should be able to install ‘android-tools-adb’ on any Debian or Ubuntu based system. https://packages.debian.org/buster/android-tools-adb

On Arch/Manjaro systems ADB is provided through the ‘android-tools’ package. https://www.archlinux.org/packages/community/x86_64/android-tools/

Once you have some kind of ADB binary on your system you can now plug in and trust your device, then run the following command depending on which of the toggle apps you’ve chosen.

Navigation Gestures - Swipe Gesture Controls! by XDA

adb shell pm grant com.xda.nobar android.permission.WRITE_SECURE_SETTINGS

Hide Navigation Bar by Manuel Wrage

adb shell pm grant com.ivianuu.hidenavbar android.permission.WRITE_SECURE_SETTINGS

If you get an error about the device not being trusted, unlock your device and trust your PC for USB debugging.

After you have successfully granted the app the permission you’re done! Now enter the app and toggle the setting on or off whenever you want! 

DriveDroid – Install and Boot Windows, Linux, or BSD using Android Device as USB Drive

DriveDroid is an extremely useful Android utility application that allows rooted Android Phones to act as USB Mass Storage or a virtual CD-ROM drive. This can come in handy for booting PCs or emulating a USB drive of your own chosen size. The app only works on phones with root. I've personally tested DriveDroid on my rooted LG Nexsus 5X using Android 8.1 Oreo and Android 9.0 Pie and can confirm it is functional for installing BSD, Linux, and Windows.

Most phones emulate a USB stick when using DriveDroid. This is baked into the kernel of your phone. This means that only images that are compatible with USB sticks can be used. All IMG files will work, but not all ISO files will.

DriveDroid http://softwarebakery.com/projects/drivedroid

Installing/Booting Linux ISO from Android

Booting into live Linux environments or installers is clearly the main use for DriveDroid and it works exactly as you'd expect. You can use the included ISO download tool included in the application to get a verity of popular distributions. I was happy to see Void Linux made the list of easily downloadable ISO's as it's a personal favorite distribution of mine. The distributions I tried include: Ubuntu 19.04, Manjaro XFCE 18.1, and Debian 10 "Buster" Net Install. All Booted both UEFI and BIOS without issue simply selecting the ISO file in the app. I would suggest downloading your ISO's from your fastest mirror using your phones browser. This allows for faster speeds and the ability to resume the download if it's interrupted.

Installing Windows using Android as Installation Media/USB Drive

To install Windows from DriveDroid you need to create the installation media the same way you with a traditional USB drive. You can emulate a standard mass storage USB drive of any size using an image file with DriveDroid but you need to first create an image to be used. I wasn't able to use the blank image creation tool inside of the app but there is a simple work around.
Open any terminal emulator on your Android device and issue the dd command with a target of /dev/zero.

dd if=/dev/zero of=MyDrive.img bs=1m count=5120

Note: The of location is where the output file will be created. This example command will create a blank 5GB image in your working directory.

This will create a new empty image file that can be written to like any standard flash drive or thumb stick. If you don't have access to a PC to burn the ISO using the Windows Media Creation Tool or WoeUSB on Linux you can download my pre-created image for Windows 10 Build 1903 (May 2019 Update) here or from the Internet Archive here: https://archive.org/details/windowsx641903may2019img